
So, you finally got an apartment, have bills or a car. And that’s all fine and dandy—until you have to write a check. You go through the process of getting a checkbook, only to be met with one problem: you have no idea how to write a check. You’ll do anything not to call Mom and Dad because you want to prove you can do this (and let’s face it, you just called them to wonder if you’re setting your kitchen on fire, if your cold means you’re dying or how to get out of a parking ticket). “I used to look up online how to write one the first 10 times I had to do it,” said University of Florida junior Nicole Chang. Don’t worry, we’ve got you.
Check out these tips that will have you writing checks like a real adult.
1. Who’s the money going to?

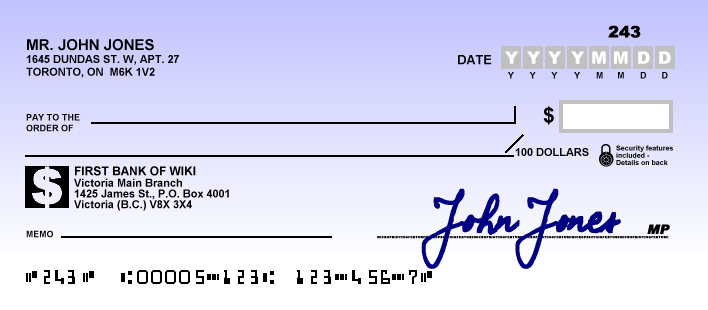
Do you see the line that says, “Pay to the Order Of”? You’ll find it in the center of the page, first line. Here, you should write where or who exactly you’re giving the check to. Think of this as the “To” on a Christmas present’s tag—who’s it for? For instance, if you’re paying a friend, write their name here. Make sure to write their full name or nickname, but not an inside joke. If you’re writing to a company, just write the company’s name (like “Target”). “I had to keep ripping up checks because I would make them out to the wrong person or write their name wrong,” said University of Iowa sophomore Erin Kimle. Double check spelling every time to make sure you’ve written the name correctly or you’ll have to scrap it and start over.
2. Just Give Me a Reason
The line in the lower left should read something like, “MEMO” (like in the example check) or “REASON.” The check will be used for what? Rent, groceries or Starbucks, it’s that easy. Just remember to keep it simple. If you plan to cash your check instead of a directly deposit into your account, check out #5 before filling this section out.
3. That White Box
You know the amount, so this step is as easy as pie. Here, write the exact amount for the check—but in numbers. Most people find this step the easiest to start with; it’s a reference for when you have to fully write it out. So, write what you know here and have it serve as a stepping stone for the rest.
4. How Much Moola
The line directly below “Pay to the Order of” comes up next. Here, you’ll write out the exact amount in words instead of placing numbers. For help, refer back to #3. Start with the dollar amounts like “twenty one dollars.” Write it out exactly how it sounds, but don’t write out the cents. For that, you put the amount of change over 100. You should see “ /100” on the example check seen above. For example, if you have $21.50, write 50 above the 100 to complete the caption. Now, your check reads “twenty one dollars 50/100.”
5. Cash Me Outside
You looking for some cold hard cash? But from your own wallet– of course. If you’d like your check cashed instead of a direct deposit, you’ll have to visit your bank. Before that, write “CASH” on the “MEMO” or “Reason” line. Then, make your way to the bank with a photo ID and you’ll be making it rain soon enough.
6. The Date
No, you haven’t finally landed your dream date. We mean the literal date. You’ll find the box for this on the upper right-hand side of your check. Write it out like “month, date, year,” (as shown on the example check). Quick tip: if you’ll need your check taken out at a later date, just put the preferred date here. For instance, you don’t get paid until the third; make it out for the third. When doing this, make sure the check recipient knows ahead of time
7. John Hancock
Place your beautiful signature on the lower right-hand side of the check. Feel free to make this as professional looking as possible. We all know you’ve been practicing your signature whenever possible. Now’s the time for all that practice to pay off.
8. Getting that Cash
To deposit your check, you have multiple options: dropping it off at your bank at a drive thru teller, going into your bank, at an ATM or mobile depositing it through an app. Though it may be convenient for some people to drop off their checks at their bank, others find this challenging. For some, their bank is miles away, not convenient to get to or only local and they’ve moved away. In this case, ask if your bank has an option to deposit a check through an app. Most apps guide you to take pictures of both sides of the check and endorse the back (signing the “Endorse Here” line and providing something about “For [Bank] Only.”) No matter how you do it, it should take a day or two for it to appear deposited in your account statement.


 How to Save Money at the University of Florida